 As described in our original scenario, we want to create a relationship between our Client list and their related documents, so that ultimately we can make a relationship between our OneNote notebook, and the related Client. We created our Client Names list in Part 2, now lets see about making the connection with the documents.
Here we have a basic document library that contains several different documents:

But how do we know which Client the Expense Report belongs to, for instance? We’d have to open the document and read its contents to try to figure it out. Wouldn’t it be nice if we could add a column that could tell us that information right in the default view of our document library? Fear not – we can!
Let’s create a new column using the Library tab the Ribbon for our document library:

Let’s name our column “Client Name”, and choose “Lookup” as the column type. SharePoint now asks us to decide which list we want to get the lookup information from. In our case, we want to use the “Client Names” list we made earlier. We’ll choose the “Title” column from that list, because that’s the column that contains each client name:

After adding this new column, we can now Edit Properties for any document, and choose a client name from a new dropdown that pulls its values from our Client Names list:

And when we’ve assigned Client Names to each document, our document library view now looks a lot better:

What’s even more superrific is that those Client Names are links that take us to the details of the Client Name we clicked on:

Hmmm…. yeah, I know what you’re thinking. Wouldn’t it be nice if this view showed us all the documents that we’ve linked up with “Contoso”? Fear not! We just need to edit the Default Form Page in the Client Names list. This can be found in the List tab of the Ribbon for the Client Names list, as shown below:

When we’re in Edit View for the Default Form Page, we’ll see that this is actually a Web Part page where we can add other web parts. In our case, tho, we simply want to click within the Main area, and Insert a Related List, which will be our Documents list. Notice that SharePoint makes this easy for us, and is already aware of any lists in the site that have the necessary relationships created:

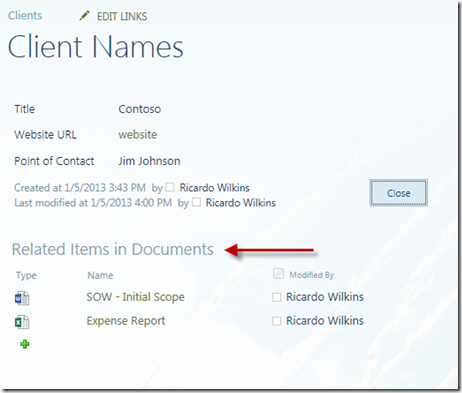
Once the Related List (“Documents”) has been added, we now get a much more interesting presentation when we view the Properties of a Client Name – our new Related Items web part has been added. This web part will always be a real-time view of any documents that are currently ‘related’ to the client name, or any documents that we relate to the client name in the future:

So now we’ve created our Client Names list, as well as the Document library with related documents. We’ve tied them together using SharePoint’s concept of Related Lists. Now we can finally add a OneNote notebook to our Document library. Stay tuned for Part 4!
یاس
ReplyDeleteSo now we’ve created our Client Names list, as well as the Document library with related documents. We’ve tied them together using SharePoint’s concept of Related Lists. Now we can finally add a OneNote notebook to our Document library. Stay tuned for Part 4!
آرش
ساسی مانکن
Once the Related List (“Documents”) has been added, we now get a much more interesting presentation when we view the Properties of a Client Name – our new Related Items web part has been added. This web part will always be a real-time view of any documents that are currently ‘related’ to the client name, or any documents that we relate to the client name in the future:
پویان مختاری